Introduction to Wall Paneling
Wall paneling is a design element that has been utilized for centuries to enhance the aesthetic and functional qualities of spaces. Traditionally made from wood, wall paneling involves the application of panels to walls, serving both decorative and practical purposes. Historically, wall paneling has roots in various architectural styles, from Renaissance homes adorned with intricate woodwork to the simpler Shaker designs emphasizing functionality. Its evolution reflects changes in technology, design trends, and societal preferences, marking its significance in interior design.
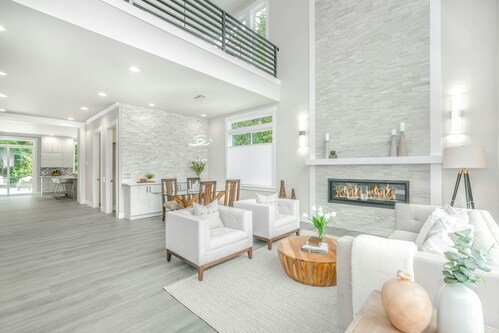
In contemporary times, wall paneling has witnessed a resurgence in popularity, becoming a favored feature in homes and commercial spaces. This revival is attributed to various factors, including the appeal of natural materials, the warmth they bring to a room, and their versatility in complementing various interior styles. Interior designers and homeowners alike are now recognizing the potential of wall paneling to create focal points, add character, and enhance the overall ambiance of a room.
Paneling styles such as shiplap, wainscoting, and beadboard each offer distinct aesthetics and can dramatically transform a space. Shiplap, known for its horizontal boards and rustic charm, works well in both traditional and modern designs. Wainscoting, typically installed in lower wall sections, adds an elegant touch while providing durability in high-traffic areas. Beadboard, characterized by its distinctive grooves, offers a quaint, cottage-like feel, making it suitable for cozy environments.
In summary, wall paneling is not just a decorative feature but a significant element of interior design with historical roots and modern applications. Its various styles contribute to the overall functionality and visual appeal of a room, making it a valuable consideration for anyone looking to transform their space.
Materials and Tools Needed for DIY Wall Paneling
Embarking on a DIY wall paneling project requires careful consideration of the materials and tools you will need to achieve satisfactory results. One of the fundamental aspects of this endeavor is selecting suitable materials. Traditional options include various types of wood such as pine, oak, and cedar, which offer a classic aesthetic. However, if you prefer alternatives to wood, consider MDF (Medium-Density Fiberboard), plywood, or even reclaimed materials that provide a unique and rustic appeal.
To ensure a smooth installation, you will also need specific tools. Essential equipment includes a miter saw for precise cuts, a hammer or nail gun for securing the panels, a level to ensure proper alignment, and a measuring tape for accurate dimensions. Additionally, you may require a drywall saw if installing over drywall. Protective gear, such as safety goggles and dust masks, is crucial for safeguarding against hazards during the project.
When it comes to acquiring these items, various options exist. Local hardware stores typically stock a wide range of wood and paneling materials, while larger retailers and home improvement centers may offer better prices for bulk purchases. For budget-conscious individuals, second-hand building supply stores and online marketplaces can provide affordable choices without compromising quality. If sustainability is a priority, seek suppliers that offer eco-friendly materials or those that support sustainable forestry practices.
This combination of properly selected materials and the right tools will lay the groundwork for a successful DIY wall paneling project, allowing you to transform your space efficiently.
Step-by-Step Guide to Installing Wall Paneling
Installing wall paneling can dramatically enhance the aesthetics of your space while providing added insulation and protection. This step-by-step guide is tailored for DIY enthusiasts of all skill levels to ensure a smooth installation process.
First, begin by preparing your materials and workspace. Measure the dimensions of the wall where the paneling will be installed. Based on these measurements, calculate the number of panel pieces required, considering any patterns or designs. Cut the paneling to size using a miter saw or jigsaw, ensuring clean, straight edges for a professional appearance.
Once the pieces are prepared, set up your work area by clearing any furniture or obstructions and laying down a drop cloth to protect the floor. Patch any holes or imperfections in the wall surface with spackle, and sand it down to create a smooth base for the paneling.
The next step involves attaching the panels to the wall. Begin at the bottom corner of the wall and use a level to ensure the first panel is straight. Apply adhesive to the back of the panel and press it against the wall, securing it with brad nails or screws, depending on the type of paneling you are using. Continue this process, ensuring each subsequent panel aligns well with the previous one. Maintain uniform gaps between panels if desired.
Once all panels are in place, it is crucial to finish the installation effectively. Fill any nail holes with wood filler and sand them down once dry. Caulk along the edges where the paneling meets the wall for a seamless look and consider painting or staining the panels to complement your decor. If any issues arise, such as misalignment, carefully adjust the panels as needed to ensure an even installation.
By following these detailed instructions, you will be well-equipped to tackle wall paneling installation successfully, transforming your space with a personal touch.
Creative Ideas for Wall Paneling Designs and Finishes
Once the wall paneling is installed, the real fun begins as you explore creative ideas to enhance its appearance and express your style. Wall paneling serves as a versatile base that can lend itself to various design aesthetics. One effective approach is to use contrasting colors. For instance, painting the paneling in a bold hue while keeping the surrounding walls neutral can create a striking visual effect. This contrast not only draws attention but can also add depth and character to the room.
Additionally, integrating decorative trim can significantly elevate the elegance of the wall paneling. Crown molding, baseboards, or even ornate chair rails can enhance the panel’s visual interest and define spaces within a room. Experimenting with different trim styles can complement the overall theme of the space, whether it is contemporary, rustic, or traditional.
Another creative option is to incorporate shelves into your wall paneling. Floating shelves can provide functional storage while serving as platforms for decorative accessories such as books, plants, or art pieces. This approach not only utilizes the paneling effectively but also introduces vertical elements that break up large expanses of wall space, creating a more dynamic composition.
Furthermore, lighting plays a crucial role in showcasing wall paneling. Utilizing accent lights, such as recessed lighting or wall sconces, can highlight the texture and finish of the panels, casting captivating shadows and enhancing the overall ambiance of the room. Selecting the right decor, such as wall art or photographs, can also complement the paneling, adding personality and warmth.
By exploring these ideas—contrasting colors, decorative trims, shelf integration, and thoughtful lighting—you can transform your wall paneling into a stunning focal point that truly reflects your style and creativity.